
Decide what to automate.
Calibrate after you have seen real volume, then wire Superset into your own systems.
Open ai.trustsuperset.com/dsars/automation.
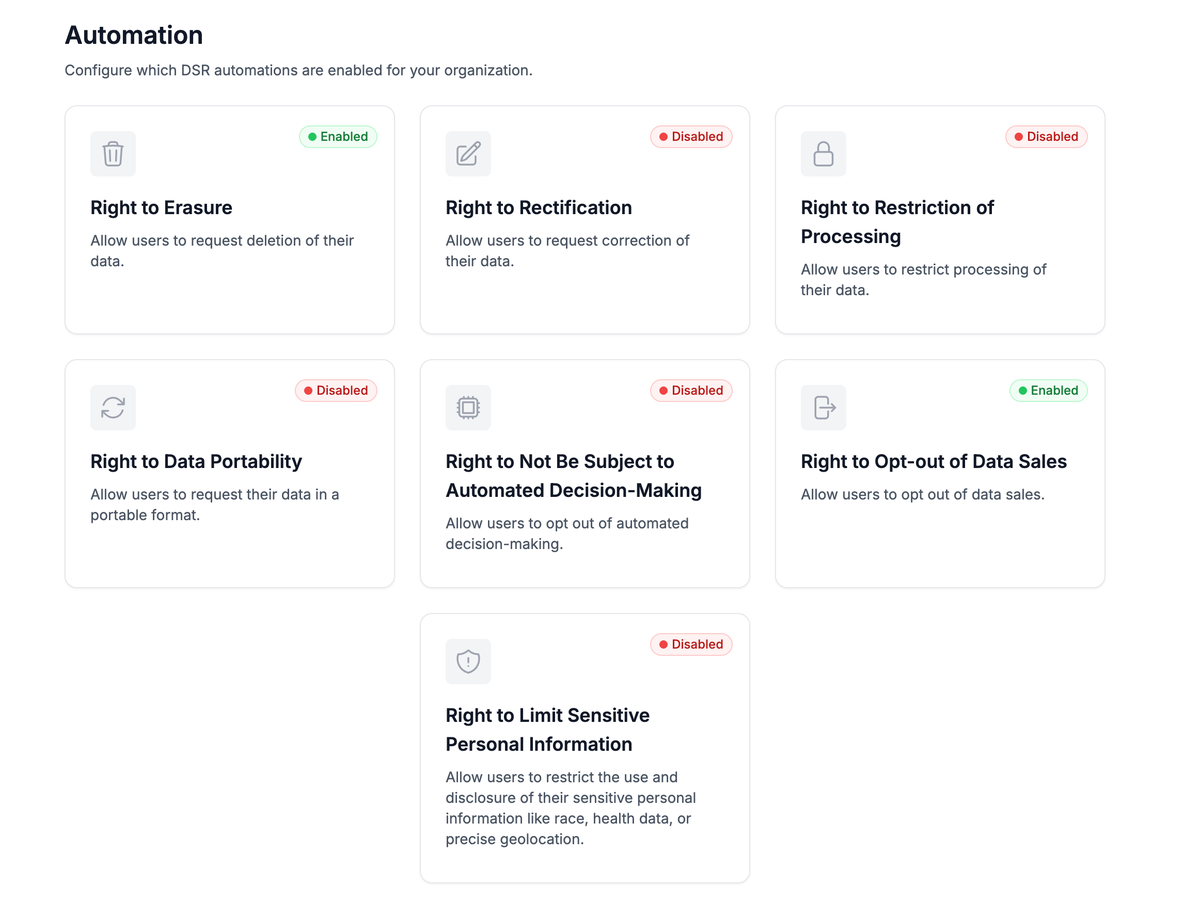
You'll see one card per DSR right, each marked Enabled or Disabled. Turning a right on means Superset will execute qualifying requests of that type automatically once they've been submitted and processed. Turning it off means those requests still flow into your queue (covered in DSR Manager), where your team picks them up and acts on them.
What to turn on first
Across Superset's customer base, two right types account for the large majority of inbound DSR volume: Erasure and Opt-out of Sales. The practical answer on day one looks like this:
- Turn on Right to Erasure. Highest-volume right across most customers. Turning this on from the start is bound to make a big impact.
- Turn on Right to Opt-out of Data Sales. Second-highest volume, especially if you share consumer data with third parties. Authorized-agent services (like Atlas Privacy) send these in waves, so automating them keeps your queue from filling up overnight.
- For the rest, decide as you go. Portability, ADMT, Restriction, Rectification, and Limit Sensitive PI usually arrive in smaller numbers and vary by business model. Handle the first few manually to spot edge cases, then flip the toggle. If you know one will be high-volume for you from day one, turn it on now.
You can flip any of these any time. Your Dashboard will show you the actual mix for your traffic after the first few weeks; if a "lesser" right type starts showing up at meaningful volume for you, flip its toggle then.
How a right's automation works
Click any right's card to open its configuration. Each right is set up as a short flow: a data subject submits a request, then Superset runs the steps you've turned on, in order.
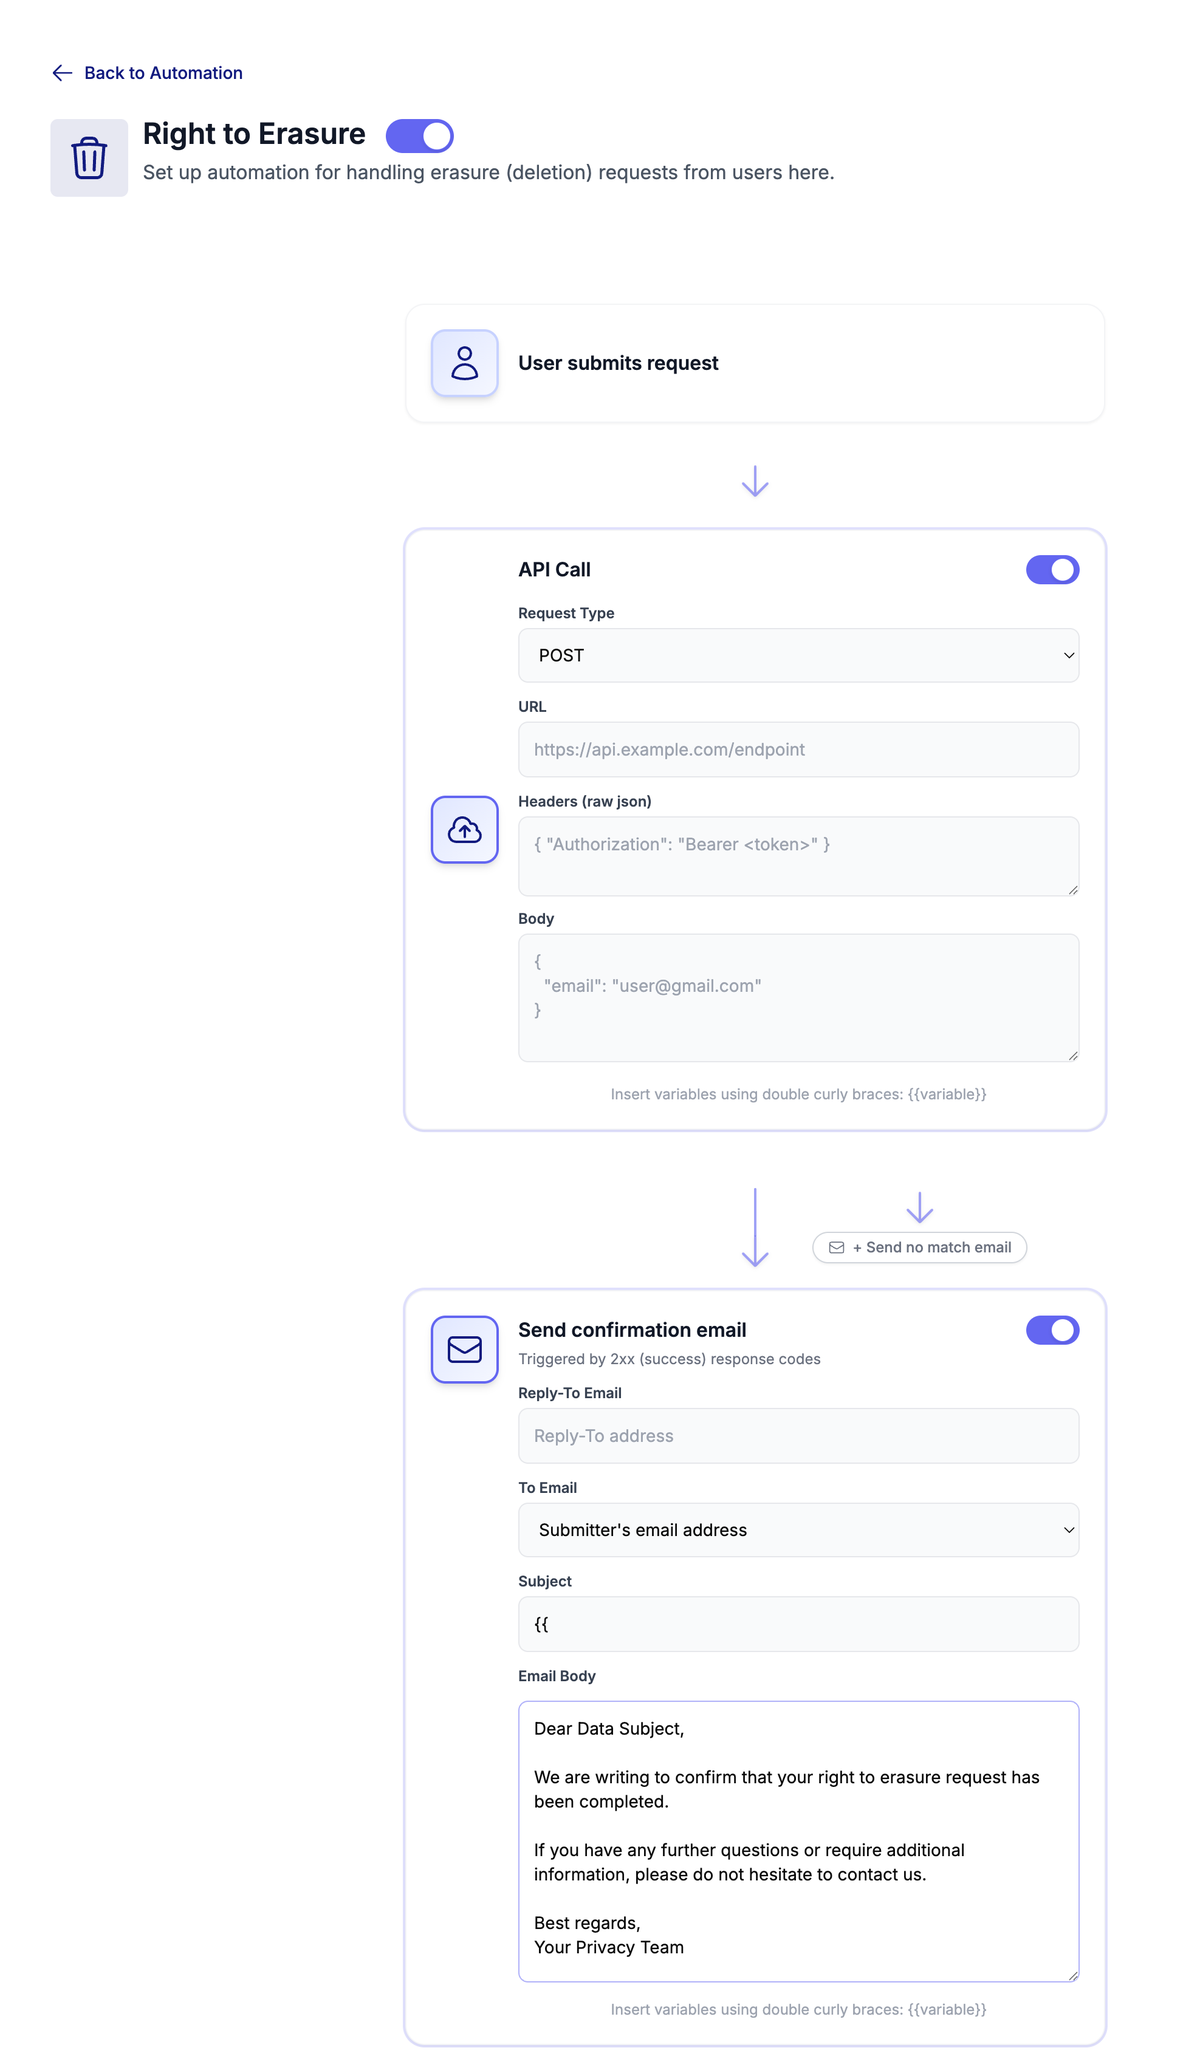
- Enable automation for this right. The master toggle at the top. When it's off, nothing below runs and the request waits in your queue.
- API Call. Turn this on to have Superset call one of your own endpoints when a qualifying request comes in. You set the Request Type (GET, POST, PUT, DELETE, or PATCH), the URL, the Headers (raw JSON, e.g. an
Authorizationbearer token), and the Body (raw JSON). This is how Superset tells your systems to actually carry out the deletion, opt-out, or other action on your side. You can drop request data into the URL, headers, and body with variables (see below). - Send confirmation email. Turn this on to email the requester once the API call succeeds. It's triggered by 2xx (success) response codes from your endpoint, so the data subject only hears "done" once your systems confirm it. You set the Reply-To, the To address (the submitter's email or the data subject's email), the Subject, and the Email Body. Whichever To setting you choose, the email goes to that one address only: if the original request was emailed to several companies at once, Superset never replies to or CCs the other recipients. Reply-To, Subject, and Email Body support request variables. Email steps also provide
{{right_name}}and{{data_subject_name}}, which aren't available in API calls.
Who gets auto-executed
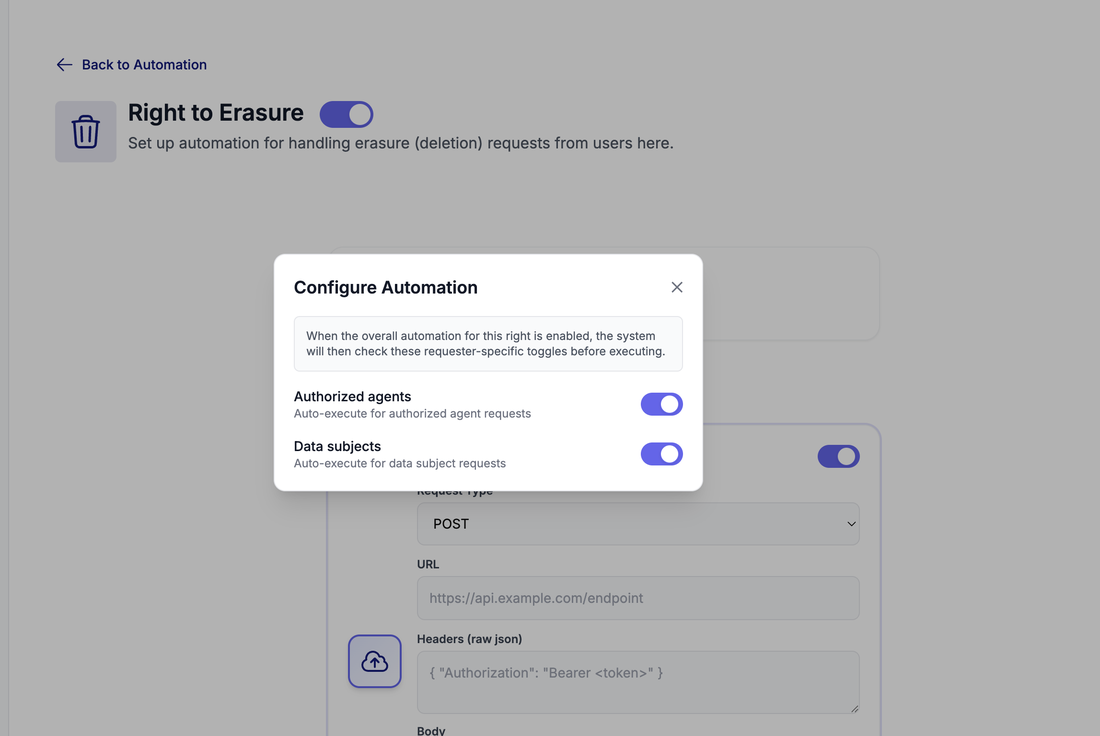
The gear icon at the top right of a right's page opens Configure Automation. Even when a right's automation is on, Superset checks two requester-specific toggles before it executes:
- Authorized agents. Auto-execute for requests that come in through authorized-agent services.
- Data subjects. Auto-execute for requests that come straight from the individual.
Leave both on for true hands-off processing. If you'd rather review one source manually at first, turn that one off and those requests will wait in your queue instead.
Using variables in your automations
You can insert request data into an automation with a variable: wrap the field name in double curly braces, like {{primary_email}}. When a request runs, Superset replaces the variable with that request's value. Use them in the API call URL, headers, and body, and in the confirmation email subject, body, and reply-to.
So an API call body like this:
{
  "email": "{{primary_email}}",
  "request": "{{request_type}}",
  "received": "{{created_at}}"
}
goes out to your endpoint with the real values filled in, for example "email": "[email protected]". The same works in a confirmation email: "Hi {{first_name}}, we've completed your {{request_type}} request."
{{ in the URL, Headers, Body, or an email field and Superset pops up the full menu of variables, grouped and labelled, to pick from.
{{email}} is now {{primary_email}}, {{address_1}} is now {{primary_address_1}}, and so on. Nothing you have configured needs to change — we updated every saved automation template for you. See the release note for the full before/after list and the one behavior change to know about.
One data subject, several identities
A data subject can present more than one identity: several email addresses, several phone numbers, a current home and a previous one. So the variables come in pairs — a primary_* scalar holding the single best value, and an all-inclusive plural array holding everything Superset has for that request.
The plural always leads with the primary. {{emails}} starts with the address {{primary_email}} gives you, {{phones}} starts with {{primary_phone}}, and {{addresses}} starts with the current address. Reach for the scalar when your system takes one identifier at a time, and for the array when it can act on all of them at once.
Variable reference
These are the variables available in DSAR automation steps, in the two groups the in-app menu uses. The Type column tells you whether the value lands as a JSON string, array, or object — which matters when you're writing a body (see Arrays and objects in a JSON body).
| Variable | Type | What it is |
|---|---|---|
| Data Subject | ||
{{first_name}} | string | First name. |
{{middle_name}} | string | Middle name. |
{{last_name}} | string | Last name. |
{{full_name}} | string | Full name, derived from first + last. |
{{primary_email}} | string | The data subject's email address — the same value as the first entry of {{emails}}. |
{{emails}} | array | Every email address held for the request, primary first. |
{{business_email}} | string | Email at a non-personal domain, when present. |
{{primary_phone}} | string | The data subject's phone number — the same value as the first entry of {{phones}}. |
{{phones}} | array | Every phone number held for the request, primary first. |
{{primary_address_1}} | string | Street address line 1, e.g. "123 Main St". |
{{primary_address_2}} | string | Street address line 2, e.g. "Ste 120". |
{{primary_city}} | string | City. |
{{primary_state}} | string | State, abbreviation or full name. |
{{primary_region}} | string | State, province, or region. |
{{primary_zip_code}} | string | ZIP / postal code. |
{{primary_postal_code}} | string | Postal code, for addresses outside the US. |
{{primary_country}} | string | Country. |
{{primary_address}} | object | The eight components above as one object — the same value as the first entry of {{addresses}}. |
{{addresses}} | array of object | Every address held for the request, current first. |
{{maids}} | array | Mobile advertising IDs (Apple IDFA, Google GAID/AAID). |
{{date_of_birth}} | string | Date of birth, as YYYY-MM-DD. |
{{linkedin_url}} | string | LinkedIn profile URL (contains linkedin.com/in/). |
{{ip_address}} | string | Requester IP. Populated for GPC and webform origins. |
{{request_type}} | string | The right being exercised: erasure, rectification, restriction, portability, automated, optout, sensitive. |
{{requester_type}} | string | Who filed it: individual or authorized_agent. |
{{applicable_law}} | string | Governing law, e.g. GDPR, CCPA, CPRA, LGPD, VCDPA, CPA, CTDPA. |
{{authorized_agent_name}} | string | Name or company of the authorized agent, when a request comes through one. |
| Metadata | ||
{{created_at}} | string | When the request was received. ISO 8601 datetime, e.g. 2026-05-04T10:30:00Z. |
{{status}} | string | One of: submitted, processing, unverified, error, completed. |
{{origin}} | string | How the request arrived: API, webform, email, gpc, or drop. |
{{type}} | string | The right being exercised, same values as {{request_type}}. |
{{processed_at}} | string | When Superset finished processing the request. ISO 8601 datetime. |
{{email_type}} | string | How the inbound was classified: dsr_request, authorized_agent, bulk_request, outgoing, other. |
An address object always carries all eight components — address_1, address_2, city, state, region, zip_code, postal_code, country — using a blank string for anything we don't hold. The shape doesn't vary, so you can read a key without checking whether it's there.
Two extras in email steps
Confirmation emails get two variables the API call doesn't: {{right_name}}, the readable name of the right being exercised (e.g. "Right to Deletion"), and {{data_subject_name}}. Both resolve in the subject, body, and reply-to of an email step, and both are already used in the default confirmation template. They resolve to nothing in an API step, so don't reach for them in a URL, header, or body.
Arrays and objects in a JSON body
{{emails}}, {{phones}}, {{addresses}}, {{maids}}, and {{primary_address}} substitute as real JSON rather than as a string. Write them unquoted, the way you'd write the literal array or object:
{
  "email": "{{primary_email}}",
  "all_emails": {{emails}},
  "all_phones": {{phones}},
  "address": {{primary_address}}
}
which reaches your endpoint as:
{
  "email": "[email protected]",
  "all_emails": ["[email protected]", "[email protected]"],
  "all_phones": ["+1 555 123 4567"],
  "address": {
    "address_1": "40 Corsi Road", "address_2": "", "city": "Bloomfield",
    "state": "NJ", "region": "", "zip_code": "07003", "postal_code": "",
    "country": "United States"
  }
}
Quoting them works too and produces exactly the same result, so an existing template that wraps one in quotes keeps rendering valid JSON. Every other variable substitutes as a string and has to be quoted.
Several phone numbers on one request
Superset used to hold one phone field, so a data subject with more than one number arrived as a single string with semicolons in it. There's now a real list: {{phones}} gives you every number, {{primary_phone}} gives you the first. Historical requests work without any backfill on your side — an old packed value is split when it's read.
An extension stays attached to its number: "555-123-4567, ext 89" is one number, not two. The rule, if you want it precisely, is that we only split on a semicolon or comma when every resulting piece holds at least seven digits.
Form fields and template variables are different vocabularies
Two similar-looking lists of names, doing two different jobs. The field ids on your DSR form — email, phone, address_1 — describe the question you ask a data subject, and they are unchanged. The template variables on this page describe the value Superset sends you. Renaming the variables didn't touch the form: a form still asks for email, and the automation that fires afterwards reads {{primary_email}}.
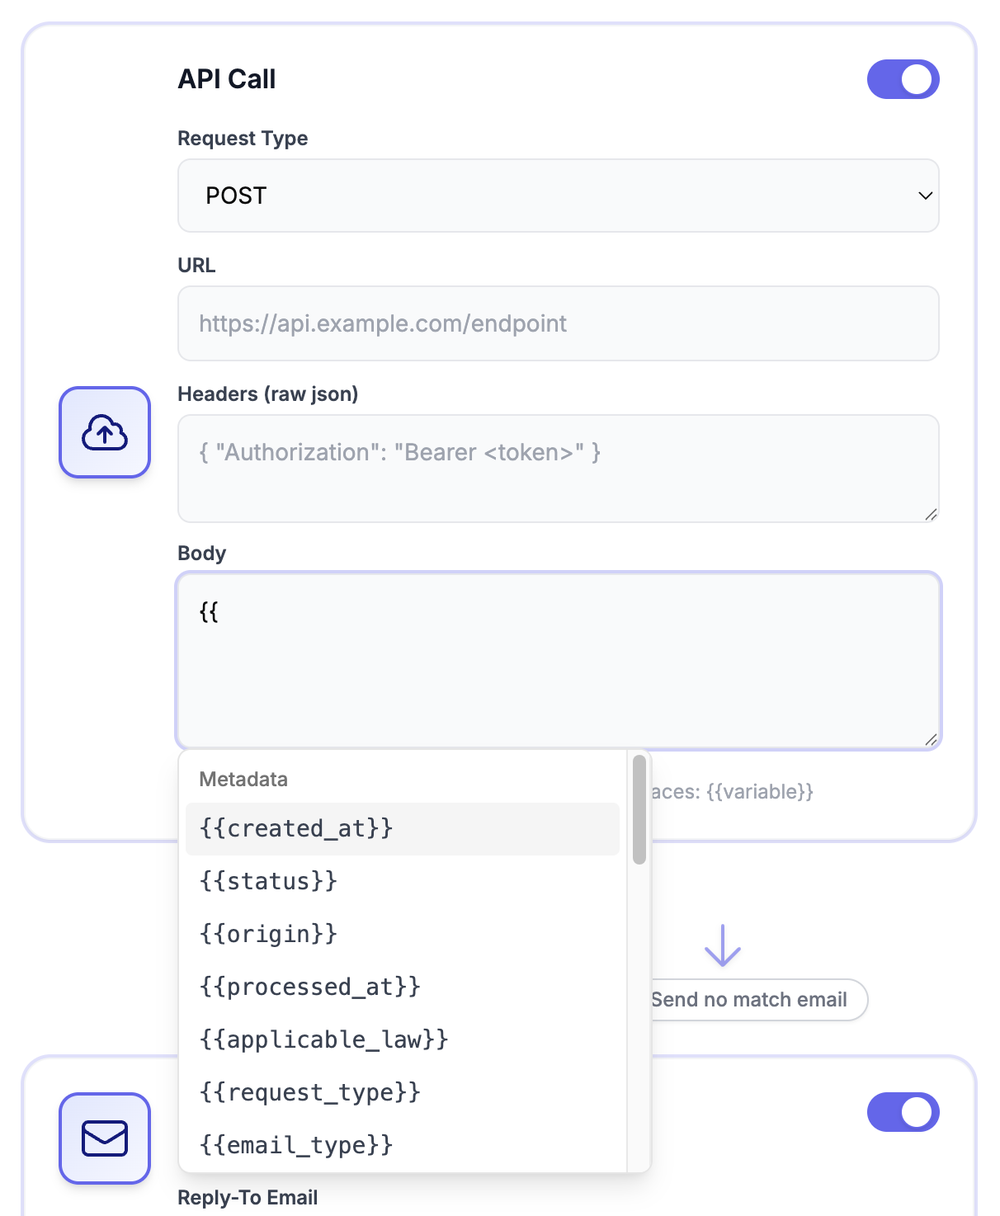
{{ in a URL, Headers, Body, or email field and Superset lists the available variables to pick from.One call per request
A request reaches your endpoint as a single API call carrying every identity Superset holds for it, rather than one call per email address. One call, one status code, one unambiguous outcome to record — and the confirmation email fires off that one result.
That's what the all-inclusive arrays are for: {{emails}}, {{phones}}, and {{addresses}} put every identity in the one payload, so nothing is lost by not fanning out. If your endpoint can only accept a single identifier per call, we can configure per-identity delivery for your organization — get in touch and we'll set it up.
Going further with the API
Everything on this page works without writing any code. The form, the inbox, and the automation toggles all run on their own, and the API Call step above already pushes each qualifying request to your endpoint as it arrives. That covers most teams.
If your engineering team wants Superset wired more directly into your systems — pulling request data on your own schedule, or creating, updating, and deleting requests programmatically — there's a REST API for that. It's an optional, developer-focused path, not a required step to finish your setup.
Using the API → — the full endpoint reference for pulling, creating, updating, and deleting requests.